Using USMT 4.0 hardlink with Configuration Manager Task Sequence
With User State Migration Toolkit 4.0 or USMT 4.0, a new feature called hardlink was introduced with it. It is the ability to perform user data backup before a new operating system is applied without making a duplicate copy of the file into a different location and then moving it back after the new operating system has been applied. This saves you time and lotsa storage space moving stuffs around.Just a few things to note. So you do need to have your Configuration Manager to be on SP2 for it to be able to support USMT 4.0, which is where hardlinks is introduced. Also another thing to note is that USMT 4.0 is not supported for Windows XP –> Windows XP scenarios but it does for Windows XP –> later operating systems.
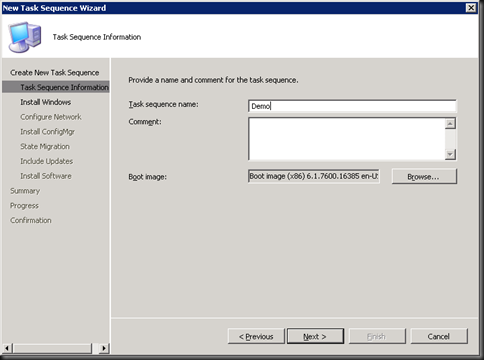
To start this off, you can either do this from a completely new task sequence (as how I am going to show you in the screen shots below) or by editing an existing task sequence which you have. So, to get to the screen below, you basically just go to the Task Sequences node, right-click it, New > Task Sequence. Then choose the Install an existing image package option.
So basically, give your task sequence a name and select the appropriate boot image.

You do need to choose you desired OS image package, enter product key if required (without KMS) and if desired, enter your local administrator password. REMEMBER to uncheck the Partition and format the target computer before installing the operating system option.
![clip_image001[5] clip_image001[5]](http://weikingteh.files.wordpress.com/2011/02/clip_image0015_thumb.png?w=484&h=360)
In this writeup, I skipped a page for Configure Network. That’s where you choose whether you want to join the computer to a workgroup or to a domain. No further explanation needed there.
Now, choose the Configuration Manager agent package to install the SCCM agent as part of the OS deployment process.
![clip_image001[7] clip_image001[7]](http://weikingteh.files.wordpress.com/2011/02/clip_image0017_thumb.png?w=484&h=360)
Here’s an important screen. It is up to you whether you want to also capture the network settings and Windows settings, but you need to make sure the Capture use settings checkbox option is selected. Browse for your USMT package and then select the Save user settings locally radio button.
Note: if the Save user settings locally radio button is disabled/greyed out, that would probably mean you had the Partition and format the target computer before installing the operating system option in previous screens selected.
![clip_image001[9] clip_image001[9]](http://weikingteh.files.wordpress.com/2011/02/clip_image0019_thumb.png?w=484&h=360)
Your choice on whether you want to install software updates as part of the deployment.
![clip_image001[11] clip_image001[11]](http://weikingteh.files.wordpress.com/2011/02/clip_image00111_thumb.png?w=484&h=360)
And…you’re almost done.
![clip_image001[13] clip_image001[13]](http://weikingteh.files.wordpress.com/2011/02/clip_image00113_thumb.png?w=484&h=360)
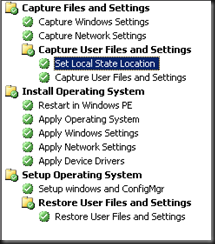
After which your task sequence will look like this.

You do still need to make some small changes. Go to the Set Local State Location and change the %_SMSTSUserStatePath% value to %SystemDrive%\UserState
![clip_image001[31] clip_image001[31]](http://weikingteh.files.wordpress.com/2011/02/clip_image00131_thumb.png?w=484&h=447)
Next add a new Set Task Sequence Variable task after the Set Local State Location task but before the Capture User Files and Settings task. Give it a name and enter OSDMigrateAdditionalCaptureOption into the Task Sequence Variable field. Enter /nocompress /hardlink into the Value field.
![clip_image001[15] clip_image001[15]](http://weikingteh.files.wordpress.com/2011/02/clip_image00115_thumb.png?w=504&h=307)
Enable verbose logging for the Capture User Files and Settings task.
![clip_image001[23] clip_image001[23]](http://weikingteh.files.wordpress.com/2011/02/clip_image00123_thumb.png?w=504&h=307)
Uncheck the Continue on error checkbox which you can find in the Options tab for the Capture User Files and Settings task.
![clip_image001[25] clip_image001[25]](http://weikingteh.files.wordpress.com/2011/02/clip_image00125_thumb.png?w=504&h=307)
Similar to what you’ve done for the capture option, add a new Task Sequence Variable task just before the Restore User Files and Settings task. This time enter OSDMigrateAdditionalRestoreOptions into the Task Sequence Variable field and /nocompress /hardlink into the Value field.
![clip_image001[27] clip_image001[27]](http://weikingteh.files.wordpress.com/2011/02/clip_image00127_thumb.png?w=504&h=307)
Enable verbose logging for the Restore User Files and Settings task.
![clip_image001[29] clip_image001[29]](http://weikingteh.files.wordpress.com/2011/02/clip_image00129_thumb.png?w=504&h=307)
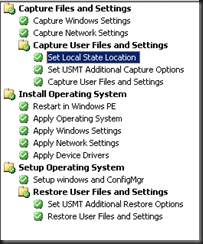
Your final task sequence should look something like this.

So, always remember that you don’t have a task to re-format and re-partition your computer when you’re working with hardlinks and you should be good.
No comments:
Post a Comment